This hand-whisked method of making classic crepes delivers paper-thin, golden perfection in 30 minutes with zero cleanup drama. Just a whisk, seven ingredients, and this foolproof technique that makes them tender, not rubbery, every single time.
This recipe is built around a hand-whisking technique that delivers thin, tender, golden crepes without any of the equipment drama. The batter rests in the fridge while you prep the fillings. And when you’re ready, you’ll swirl out crepe after crepe like you’ve been doing this your whole life.
Whether you’re craving peanut butter and jelly with powdered sugar or scrambled eggs with cheddar, this is your new baseline.

Why We Love This Recipe
- Ready in under an hour — including resting time, which you can use to do literally anything else
- Only 7 ingredients — all basics you probably already have in your kitchen
- Tender, never rubbery — the resting step guarantees restaurant-quality texture every time
- Sweet or savory — one neutral base works for breakfast, dinner, or dessert
- Stores beautifully — make a batch and reheat throughout the week
- Beginner-friendly — the first crepe is your practice round, and by the third you’ll have it down
Crepes are forgiving, but they do ask for a little patience up front. The good news? The actual cooking part is fast, repeatable, and borderline therapeutic once you get into a rhythm.

Classic Crepes That Turn Out Perfect Every Time
As an Amazon Associate I earn from qualifying purchases.


Ingredients
- 2 Cups Milk (2% or whole milk)
- 4 Large Eggs
- 3 Tablespoons Unsalted Butter melted and slightly cooled
- 1 Teaspoon Vanilla Extract (omit for savory crepes)
- 1 Tablespoon Granulated Sugar
- ½ Teaspoon Fine Sea Salt
- 1½ Cups All-Purpose Flour sifted
Instructions
- Whisk the wet ingredients first. Crack your eggs into a large mixing bowl and whisk them until they're smooth and slightly frothy, about 1 minute. This aerates the eggs and gives your crepes a lighter texture. Pour in milk, melted and slightly cooled butter, and vanilla extract (skip the vanilla if you're going savory). Whisk until everything is fully combined and the mixture looks unified, not streaky.2 Cups Milk, 4 Large Eggs, 3 Tablespoons Unsalted Butter, 1 Teaspoon Vanilla Extract
- Sift your dry ingredients. In a separate large bowl, sift together all-purpose flour, granulated sugar, and fine sea salt. Sifting isn't just for show. It breaks up clumps and makes the flour easier to incorporate without overworking the batter. If you skip this step, you'll spend five extra minutes trying to whisk out lumps.1 Tablespoon Granulated Sugar, ½ Teaspoon Fine Sea Salt, 1½ Cups All-Purpose Flour
- Combine wet and dry ingredients gently, then go hard. Pour the wet mixture into the bowl with the dry ingredients. Start by gently folding with your whisk until all the flour is coated and moistened. This prevents flour from flying everywhere and helps you avoid overmixing too early. Once everything is roughly combined, whisk vigorously for about 5 minutes until the batter is completely smooth and slightly glossy. Your arm will get tired. That’s normal. The vigorous whisking is what builds structure without gluten development, which keeps your crepes tender instead of chewy.
- Strain if needed. If you see any small lumps, don’t panic. Pour the batter through a fine-mesh strainer into a clean bowl. This takes 30 seconds and guarantees a perfectly smooth batter. It’s optional, but it’s also the difference between good crepes and great ones.
- Rest the batter in the fridge. Cover the bowl with plastic wrap or a lid and refrigerate for at least 30 minutes. You can also leave it overnight, which actually makes the crepes even better. Resting allows the flour to fully hydrate and the gluten to relax, so your crepes come out tender and airy instead of dense or rubbery. This step is non-negotiable if you want restaurant-quality results.
- Heat your pan correctly. Use a non-stick 8-inch skillet (or crepe pan if you have one) and set it over medium-low heat. Let it preheat for 2 to 3 minutes. The pan needs to be evenly heated, not screaming hot. Spray lightly with cooking spray or brush with a tiny bit of melted butter. If the pan is too hot, your crepes will cook too fast and develop dark spots. If it’s too cool, they’ll stick and tear.
- Pour and swirl fast. Pour ¼ cup of batter into the center of the pan, then immediately lift the pan off the heat and swirl it in a circular motion to spread the batter into a thin, even layer. You need to do this within 2 seconds of pouring. The batter sets quickly, so if you hesitate, you’ll end up with a thick spot in the middle. It takes a couple of tries to get the motion down, but once you do, it becomes automatic.
- Cook until the edges lift. Let the crepe cook undisturbed for about 1 minute. You’ll know it’s ready to flip when the edges start to lift away from the pan and the bottom is lightly golden. Don’t rush this. If you try to flip too early, the crepe will tear. Use a thin spatula or your fingers (if you’re brave) to gently lift one edge, then flip the crepe in one smooth motion.
- Cook the second side briefly. The second side only needs about 20 to 30 seconds. It won’t brown as evenly as the first side, and that’s totally fine. The first side is your “presentation side.” Once the second side is set, slide the crepe onto a plate.
- Repeat and stack. Continue with the remaining batter, lightly spraying the pan every 2 to 3 crepes as needed. Stack the finished crepes on a plate as you go. They won’t stick to each other. If you’re making a big batch, you can keep them warm by covering the stack loosely with foil.
- By the time you’ve made three or four crepes, you’ll have the rhythm down and you’ll be cranking them out faster than you can fill them.
Your Own Private Notes
Nutrition
How to Know It’s Done
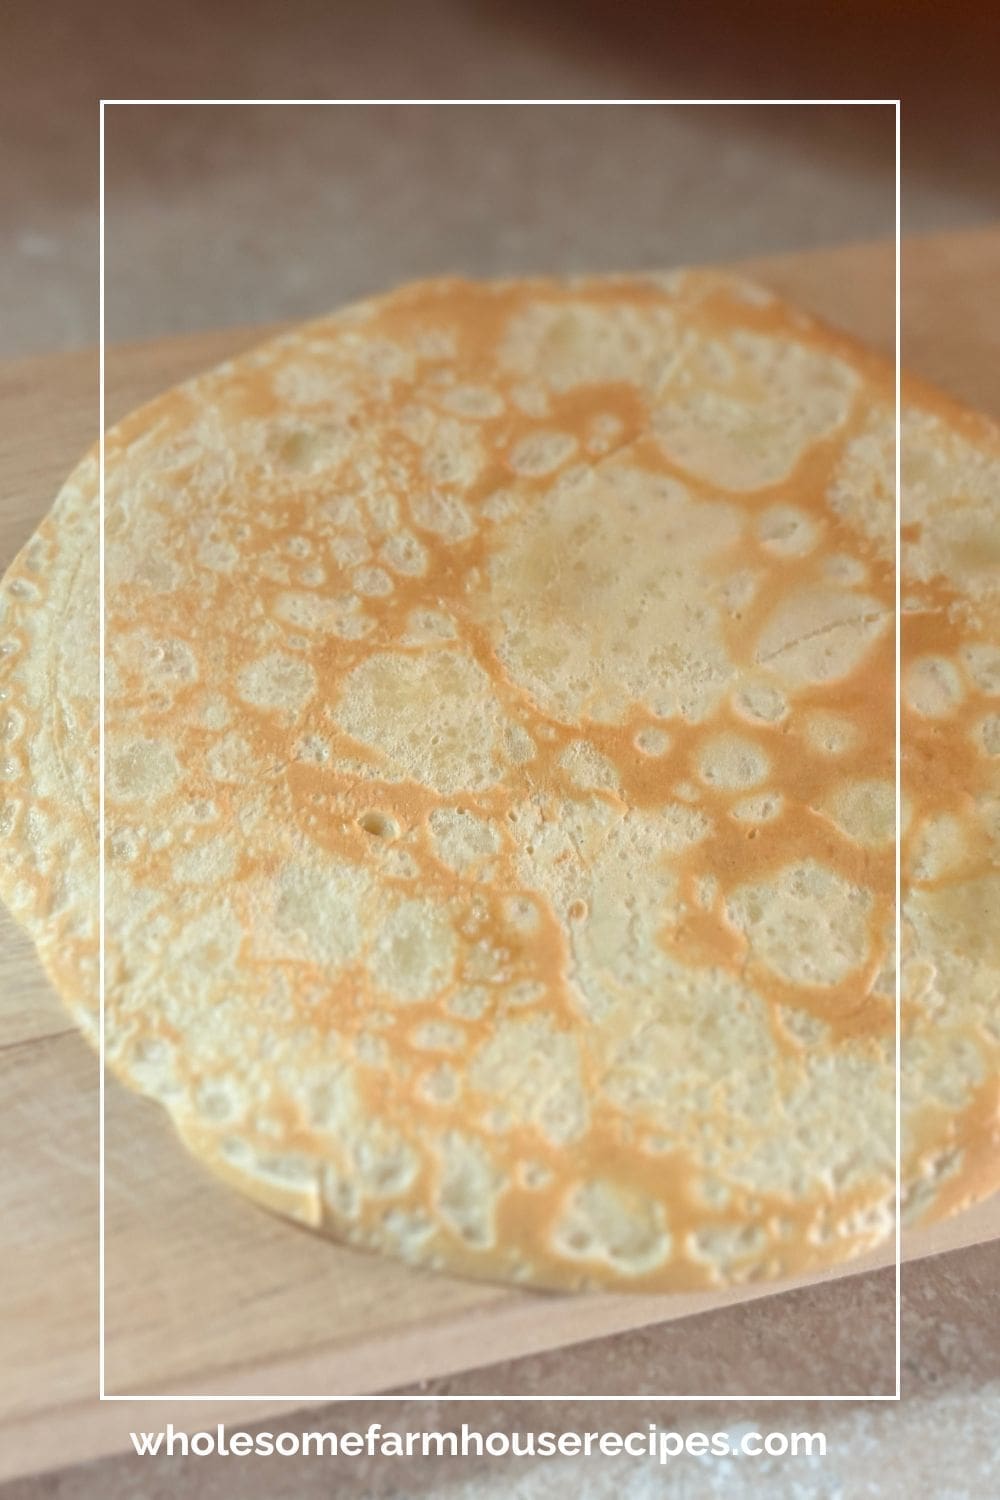
Crepes are done when the edges curl up slightly and pull away from the pan, and the bottom surface has turned a light, even golden brown with a few deeper caramel-colored spots scattered across it.
If you gently shake the pan, the crepe should slide around freely, not stick or resist. That’s your green light to flip. On the second side, you’re just looking for the batter to set. It might have a few pale spots or light browning, but it won’t look as pretty as the first side. That’s expected. The first side is the one you present, so don’t stress about the back.
If your crepes are coming out thick, doughy, or pancake-like, your batter is probably too thick or your pan is too cool. Thin the batter with a tablespoon or two of milk, and bump your heat up slightly. If they’re browning too fast or developing dark, crispy edges, your pan is too hot. Drop the heat and give the pan 30 seconds to cool before pouring the next one.
Smell is also a clue. When the crepe is ready to flip, you’ll catch a buttery, toasted aroma. If it starts to smell burnt, you’ve gone too far.

Tips from the Pros
Professional crepe cooks swear by a few tricks that make the process faster, cleaner, and way more consistent.
- Use a ladle or measuring cup with a pour spout. It gives you more control than pouring straight from a bowl, and you’ll waste less batter. A ¼-cup measure is perfect for 8-inch crepes.
- Keep a damp towel nearby. After every few crepes, wipe the pan with the damp towel to remove any residual butter or batter buildup. This prevents sticking and keeps your crepes cooking evenly. Just make sure the pan isn’t screaming hot when you do it, or you’ll steam yourself.
- Let the first crepe be your test. The first one is almost always weird. It’s too thick, too pale, or it sticks. That’s your calibration crepe. Use it to adjust your heat, your batter consistency, and your swirling technique. Don’t judge yourself by crepe number one.
- Adjust batter thickness as you go. Crepe batter thickens slightly as it sits because the flour continues to absorb liquid. If you notice your later crepes are coming out thicker than the first few, whisk in a tablespoon of milk at a time until the batter returns to a thin, pourable consistency.
- Don’t over-grease the pan. You only need a whisper of oil or butter. Too much and your crepes will be greasy and won’t brown properly. A light mist of cooking spray or a quick swipe with a buttered paper towel is all you need.
- Master the wrist flick. Once you get comfortable, you can skip the spatula and flip crepes with a quick flick of the wrist. It’s faster, cooler-looking, and gives you more control. Practice over a plate the first few times in case you miss.
These small adjustments are what separate home cooks from people who look like they’ve been making crepes in a Parisian cafe for 20 years.
Serving Suggestions
Crepes are best served warm, either folded into quarters or rolled into tight cylinders, depending on the filling.
For sweet crepes, dust them with powdered sugar, drizzle with maple syrup or honey, and top with fresh berries, sliced bananas, or whipped cream. A small handful of toasted nuts like almonds, pecans, or hazelnuts adds crunch and makes the whole thing feel more composed. If you want to go full dessert mode, add a scoop of vanilla ice cream or a dollop of mascarpone.
For savory crepes, fold them around scrambled eggs, sautéed mushrooms, crispy bacon, or ham and cheese. A sprinkle of fresh herbs like chives, parsley, or thyme makes them look and taste restaurant-ready. You can also serve them open-faced with the filling spooned on top, then folded at the table.
If you’re serving a crowd, stack the crepes on a large platter and set out bowls of different fillings and toppings so people can build their own. It’s low-effort hosting that feels generous and fun.
Pairing Suggestions
Sweet crepes pair beautifully with coffee, hot chocolate, or a glass of cold milk.
If you’re serving them for brunch, try a light sparkling wine like Prosecco or a citrusy mimosa. The acidity cuts through the richness of the butter and cream. For a non-alcoholic option, fresh-squeezed orange juice or a berry smoothie works perfectly.
Pair savory crepes with a simple green salad dressed in vinaigrette, or serve them alongside roasted vegetables or a cup of soup for a full meal.
The key is balancing richness with brightness, so your palate doesn’t feel heavy halfway through.
Variations and Swaps
This base recipe is wildly flexible, and once you’ve made it a few times, you’ll start improvising without thinking twice.
- Make them gluten-free. Swap the all-purpose flour for a 1-to-1 gluten-free baking blend. The texture will be slightly more delicate, but the crepes will still work beautifully. Add an extra tablespoon of melted butter to help with browning.
- Go full savory. Omit the sugar and vanilla extract. Add a pinch of black pepper, garlic powder, or fresh chopped herbs like thyme or rosemary directly to the batter. These are perfect for wrapping around roasted vegetables, pulled pork, or even leftover steak and peppers.
- Make them dairy-free. Replace the milk with oat milk, almond milk, or coconut milk, and use melted coconut oil instead of butter. The flavor will shift slightly, but the texture stays tender.
- Add cocoa powder for chocolate crepes. Whisk 3 tablespoons of unsweetened cocoa powder into the dry ingredients and add an extra tablespoon of sugar. These are incredible filled with Nutella, whipped cream, or fresh raspberries.
- Use them as tortilla replacements. Seriously. Savory crepes work as a lighter, more delicate swap for flour tortillas in tacos, quesadillas, or breakfast burritos. They won’t hold up to super heavy fillings, but for eggs, cheese, and veggies, they’re perfect.
- Try buckwheat crepes. Replace half the all-purpose flour with buckwheat flour for a nutty, earthy flavor. This is traditional in Brittany, France, and pairs especially well with ham, cheese, and eggs.
Once you understand the formula, crepes become a vehicle for whatever you’re craving, not a rigid recipe you have to follow.

Storage Tips
Cooked crepes store incredibly well, which is one of the reasons they’re so practical for meal prep or batch cooking.
Let the crepes cool completely, then stack them with a small piece of parchment or wax paper between each one to prevent sticking. Place the stack in an airtight container or a resealable plastic bag and refrigerate for up to 4 days.
For longer storage, freeze them. Wrap the parchment-separated stack tightly in plastic wrap, then place it in a freezer-safe bag or container. They’ll keep for up to 2 months. When you’re ready to use them, thaw in the fridge overnight or let them sit at room temperature for 20 minutes.
To reheat, warm them in a dry skillet over low heat for about 10 seconds per side, or microwave them for 15 to 20 seconds. Don’t overheat or they’ll dry out and become brittle. You can also reheat a stack wrapped in foil in a 300-degree oven for about 10 minutes.
Unbaked crepe batter also stores well. Keep it covered in the fridge for up to 2 days. Just give it a good whisk before using, and thin it with a splash of milk if it’s thickened up.
Leftover Transformations
Leftover crepes are a gift because they’re so easy to repurpose into completely different meals.
Cut them into strips and toss them into a bowl of chicken soup or broth-based noodle soup as a soft, silky noodle substitute. Slice them into ribbons, toss with butter and Parmesan, and serve them like fresh pasta. It’s fast, comforting, and uses up crepes that might be a day or two old.
You can also turn them into crepe lasagna. Layer savory crepes with ricotta, marinara, mozzarella, and cooked ground beef or sausage, then bake at 375 degrees for 20 minutes. It’s lighter than traditional lasagna but just as satisfying.
For sweet leftovers, make a crepe cake by stacking crepes with layers of whipped cream, pastry cream, or Nutella in between. Chill the whole thing for an hour, slice it like a layer cake, and serve it as an impressive dessert that took almost no effort.
You can even cut crepes into wedges, bake them at 350 degrees for 8 to 10 minutes until crispy, and use them as dippers for yogurt, hummus, or chocolate sauce.
The longer you keep crepes in your rotation, the more you’ll realize they’re not just breakfast. They’re a base ingredient you can twist into whatever your week demands.
Easy Crepes Recipe
Crepes have this reputation for being intimidating, but the truth is they’re one of the most forgiving, versatile things you can learn to make. Once you get the batter right and the pan rhythm down, you’ll make them without thinking twice.
They’re just as good for a lazy Sunday morning as they are for a fast weeknight dinner. And the best part? No blender, no stress, no complicated technique. Just a whisk, a hot pan, and 30 minutes between you and something that feels way fancier than the effort you put in.


Depending on the filling we use, we have them for breakfast, lunch or dinner.