
Make cold fermented sourdough sandwich bread with 4 simple ingredients. This homemade loaf develops rich sourdough flavor with a long, slow ferment.
Homemade sandwich bread is a wonderful staple to have in the kitchen. It’s perfect for morning toast, lunchtime sandwiches, and serving alongside a bowl of homemade soup. With just four simple ingredients, you can make a loaf at home without kneading the dough by hand.
This recipe uses a long, cold fermentation to develop the flavor of the bread while making it easier to handle before baking. After mixing the dough and completing a few rounds of stretch and folds, most of the work is simply waiting. The dough rises at room temperature before spending 24 to 72 hours in the refrigerator.
The recipe comes from my niece Mal, who has spent many hours experimenting with her sourdough starter to get this loaf just right. It has become her family’s favorite sandwich bread, and I can see why this method is worth keeping in the regular baking rotation.
If you’ve been looking for a way to make homemade sourdough bread that fits into your schedule, this is a recipe worth trying. A little preparation gives you a flavorful loaf that’s ready to slice for sandwiches, toast, and everyday family meals.

Why You’ll Love This Recipe
- Make-ahead convenience. Prepare the dough ahead of time and let it ferment in the refrigerator until you’re ready to bake.
- Great for everyday meals. The loaf-pan shape makes it easy to cut even slices for sandwiches and toast.
- Develops wonderful flavor. The extended cold ferment gives the bread time to develop a more pronounced sourdough flavor.
- No kneading required. A series of stretch-and-fold movements helps develop the gluten and give the dough structure.
- A simple ingredient list. All you need is bread flour, water, active sourdough starter, and salt.
The process takes a little planning, but most of the time is hands-off. You’ll mix the dough,
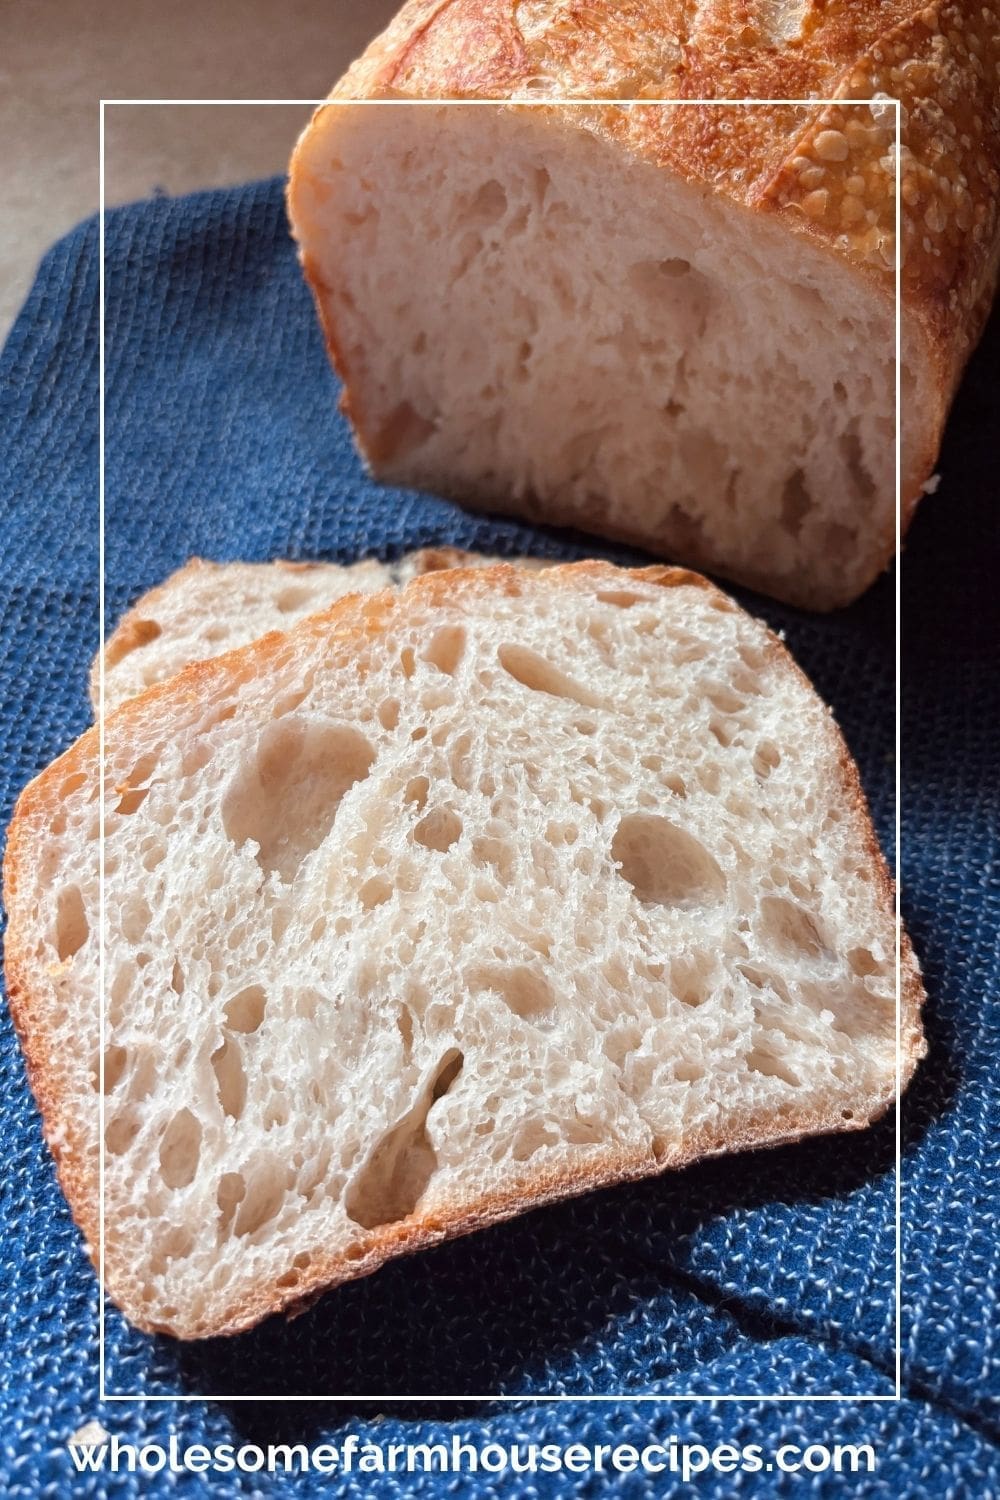
The result is a homemade loaf with a deep golden crust, a soft interior, and the distinctive flavor that makes sourdough such a favorite.

Cold Fermented Sourdough Sandwich Bread Recipe
As an Amazon Associate I earn from qualifying purchases.
Kitchen Essentials


Ingredients
- 500 Grams Bread Flour
- 350 Grams Water
- 100 Grams Sourdough Starter Active Risen
- 10 Grams Salt
Instructions
How to Make Cold Ferment Sourdough Sandwich Bread
- Step 1: Mix the Dough. Add the active sourdough starter and water to a large mixing bowl. Stir until the starter breaks apart and the water looks cloudy.100 Grams Sourdough Starter, 350 Grams Water
- Add the bread flour and salt. Mix with a wooden spoon until the ingredients come together into a shaggy dough.500 Grams Bread Flour, 10 Grams Salt
- Switch to your hands and squeeze the dough gently, working any dry flour into the mixture. Continue for about 5 minutes, until the dough is cohesive.
- Sourdough dough can feel sticky at this stage. Keep a small bowl of water nearby to wet your hands when needed.
- Step 2: Let the Dough Rest. Cover the bowl with a damp cotton towel and let the dough rest for about 1 hour.
- This resting period gives the flour time to absorb the water and allows gluten development to begin without extensive kneading.
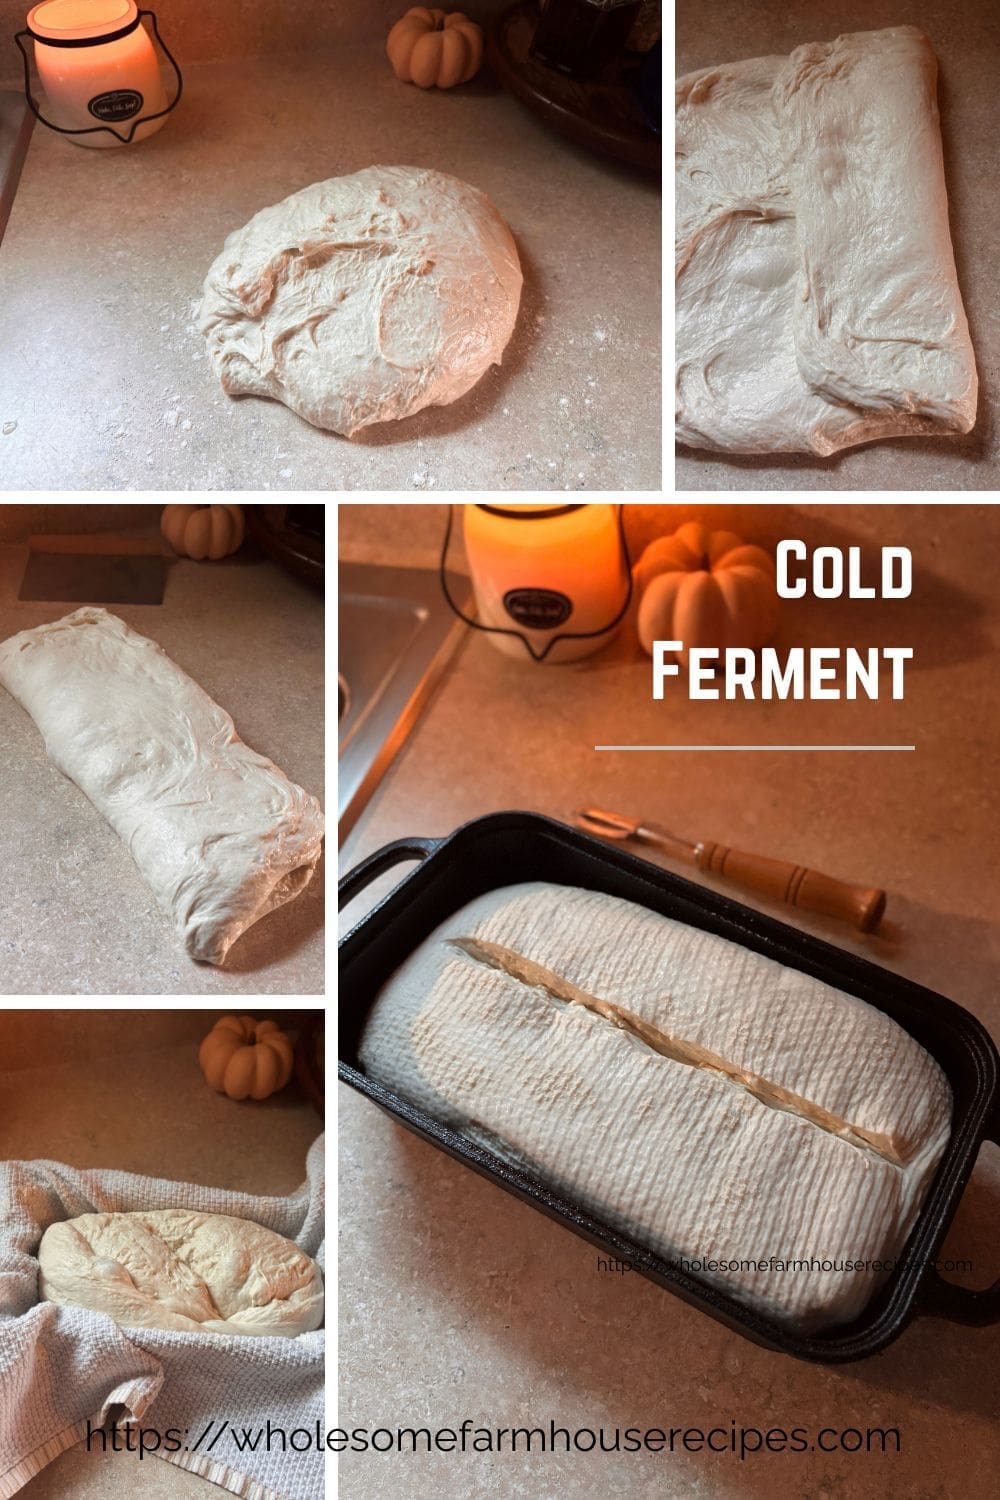
- Step 3: Stretch and Fold. Wet your hands and lift one edge of the dough from underneath. Stretch it gently upward, then fold it over the center.
- Rotate the bowl and repeat around the dough until you’ve worked your way around the entire bowl.
- Cover the dough and let it rest for about 30 minutes before repeating.
- Complete two or three additional rounds of stretching and folding, allowing the dough to rest between each round.
- You can also use coil folds for some of these rounds. To do this, lift the dough vertically with wet hands, allow it to stretch under its own weight, and fold it back over itself.
- Don’t worry if your folds aren’t perfect. The goal is to strengthen the dough gradually without tearing it.
- Step 4: Let the Dough Rise. After the final round of folds, cover the dough and let it rise in a warm spot in your kitchen.
- This stage generally takes 6–12 hours, depending on your starter’s activity and the temperature of your kitchen.
- Look for these signs that fermentation is progressing:
- The dough has noticeably increased in size, roughly doubling in volume.
- Small bubbles are visible on the surface or along the sides of the bowl.
- The dough looks lighter and feels more elastic than it did when first mixed.
- The dough should spring back slowly when gently pressed with a wet finger.
- These visual cues are more helpful than relying on a specific number of hours. If your kitchen is cool, the dough may need longer.
- Step 5: Shape the Loaf. Lightly flour your work surface and turn the risen dough out of the bowl.
- If you’re adding seeds, dried fruit, or other additions, gently stretch the dough into a flatter shape and distribute them over the surface before folding them in.
- To shape the loaf, fold the sides toward the center. Then roll the dough tightly from one end to the other, creating a loaf shape with a taut outer surface.
- Use a dough scraper and lightly wet hands as needed to make handling easier. Try not to tear the dough while shaping.
- Step 6: Refrigerate for the Cold Ferment. Line a loaf pan with a dry, floured cotton tea towel. Place the shaped dough in the pan with the seam facing up.
- Gently pinch the seam closed so the loaf holds its shape. Loosely fold the towel over the top of the dough.
- Place the pan in the refrigerator for 24 hours, or up to 72 hours.
- This extended cold ferment develops the sourdough flavor and firms up the dough, making it easier to handle when it’s time to bake.
- The longer refrigerator rest generally produces a more pronounced sourdough flavor, although the result will also depend on your starter and fermentation conditions.
- Step 7: Prepare the Loaf for Baking. When you’re ready to bake, preheat the oven to 450°F.
- Grease a second loaf pan well with butter or oil.
- Remove the dough from the refrigerator and gently lift it from the towel. Place it in the greased baking pan with the seam facing down.
- Use a sharp knife or bread lame to make one long cut down the center of the loaf. This score gives the bread a controlled place to expand as it bakes.
- Spray the top generously with water.
- Cover the loaf with an inverted, greased loaf pan or a piece of greased foil. The cover helps retain moisture during the first part of baking.
- Step 8: Bake the Bread. Bake the covered loaf for 30 minutes at 450°F.
- Carefully remove the cover and continue baking for another 20 minutes, until the crust is deep golden brown.
- If the crust begins browning too quickly, tent the loaf loosely with foil during the remaining baking time.
- The bread should be fully baked before you remove it from the oven. If you use an instant-read thermometer, aim for an internal temperature of approximately 200–210°F.
- Step 9: Cool Before Slicing. Remove the loaf from the pan and place it on a wire rack.
- Let the bread cool for at least 1 hour before slicing.
- I know it’s tempting to cut into a warm loaf fresh from the oven, but giving it time to cool helps the crumb finish setting. Slicing too early can leave the center gummy and make the bread harder to cut into neat sandwich slices.
Your Own Private Notes
Notes
Active preparation: About 30 minutes, spread throughout the initial mixing and folding process
First rise: Approximately 6–12 hours, depending on your starter and kitchen temperature
Cold ferment: 24–72 hours
Bake time: Approximately 50 minutes
Cooling time: At least 1 hour
Tips for Success
The process is straightforward once you understand what each stage accomplishes. Plan ahead, since the dough needs a long first rise followed by at least 24 hours in the refrigerator. Important: The dough needs time to ferment before it goes into the refrigerator. Watch its appearance and volume rather than relying on the clock alone. The refrigerator rest is an additional step after the first rise.Equipment You’ll Need
You don’t need an elaborate bread-making setup for this recipe. A few basic kitchen tools will help you work with the dough. Kitchen scale: Essential for measuring the ingredients accurately. Large mixing bowl: Gives the dough room to develop during the first rise. Wooden spoon: Useful for mixing the starter, water, flour, and salt. Two loaf pans: One holds the dough during the refrigerator rest, and the other is used for baking. A cast-iron loaf pan with a matching lid is another option for baking. Otherwise, a regular metal loaf pan covered with an inverted loaf pan or greased foil works with this method. Cotton tea towels: One damp towel covers the dough during the initial rest and rise. Another, kept dry and floured, lines the pan during the cold ferment. Dough scraper: Helps lift and shape the sticky dough. Sharp knife or bread lame: Used to score the loaf before baking. Spray bottle: Makes it easy to mist the top of the dough before covering it for baking. A few small details can make the process easier and help you get more consistent results. Use an active starter. Your starter needs to be bubbly and ready to raise the dough. An inactive starter can make fermentation take much longer than expected. Weigh your ingredients. A kitchen scale provides more consistent results than measuring flour and water by volume. Watch the dough, not just the clock. Temperature affects fermentation. Use the dough’s size, bubbles, and texture to decide when the first rise is complete. Keep your hands wet when handling sticky dough. Wet hands and a dough scraper help prevent sticking without adding too much extra flour. Shape with care. A taut outer surface and a well-sealed seam help the loaf maintain its structure. Grease the baking pan thoroughly. This makes it easier to remove the loaf after baking. Allow enough cooling time. Give the loaf at least an hour on a wire rack before slicing.Nutrition
Why This Recipe Works
This recipe combines room-temperature fermentation with an extended refrigerator rest.
The first rise gives the sourdough starter time to ferment the dough and build volume. Stretching and folding helps strengthen the gluten, which gives the loaf structure and helps it hold its shape.
The cold ferment slows fermentation while allowing the flavor to continue developing. It also firms up the dough, making it easier to handle and score before baking.
Finally, baking the loaf in a covered pan helps retain moisture during the initial stage of baking. Removing the cover toward the end allows the crust to brown and become crisp.

Ingredient Notes
This recipe uses only four ingredients, but each one plays an important role in the finished loaf.
Bread Flour
Bread flour provides the protein needed to develop gluten. That structure helps the dough hold its shape and gives the bread a satisfying texture.
For the most consistent results, weigh the flour rather than measuring it with cups. Even small differences in flour measurements can affect the amount of water the dough needs.
Water
Water hydrates the flour and brings the dough together. It also affects how easily the dough stretches and how fermentation progresses.
Mal recommends using slightly warm water, around 80°F, when mixing the dough.
Active Sourdough Starter
The starter provides the natural leavening for this bread. Use an active, bubbly starter that has been fed and is showing signs of activity.
A starter that doubles in size within several hours of feeding is often a useful indication of readiness, although the exact timing depends on temperature, flour, and starter strength.
If your starter is sluggish, the dough may take longer to rise.
Salt
Salt adds flavor and helps regulate fermentation. Weigh it for consistent results, just as you would the flour and water.
Troubleshooting Sourdough Sandwich Bread
Even experienced bakers sometimes have a loaf that doesn’t turn out quite as expected. Here are some common problems and how to address them.
Why Isn’t My Dough Rising?
Your starter may not be active enough, or your kitchen may be too cool.
Give the dough additional time in a warm spot and look for bubbles and an increase in volume. Sourdough fermentation can vary considerably, so don’t move on to shaping just because the expected number of hours has passed.
Why Is My Dough So Sticky?
Sticky dough is normal, especially early in the process.
Wet your hands before stretching and folding, and use a dough scraper when shaping. A light dusting of flour on your work surface can help, but avoid adding large amounts of extra flour because it changes the dough’s hydration.
Why Didn’t My Bread Rise Much in the Oven?
Poor oven spring can happen when the dough hasn’t fermented enough or has fermented too long and lost some of its strength.
Pay attention to the dough during the first rise, and handle it gently when shaping. Creating a taut outer surface helps the loaf hold its structure as it bakes.
Why Is the Center of My Bread Gummy?
Bread can have a gummy interior if it hasn’t baked long enough or if it is sliced while still hot.
Bake until the crust is deep golden brown and the internal temperature reaches approximately 200–210°F. Then allow the loaf to cool on a wire rack for at least an hour before cutting.
Why Is My Crust Too Dark?
Ovens can vary, and the crust may brown faster than expected.
If the bread is getting too dark during the uncovered portion of baking, loosely tent it with foil and continue baking until the center is fully cooked.
Variations and Ingredient Swaps
Once you’re comfortable with the basic recipe, you can make a few adjustments to change the flavor and texture.
Whole Wheat Sourdough Bread
Replace up to half of the bread flour with whole wheat flour for a heartier loaf with more texture.
Whole wheat flour absorbs more water, so Mal recommends adding another 10–20 grams of water when using this variation. Start with the smaller amount and adjust based on how the dough feels.
Sourdough Bread with Rye Flour
Replace up to 100 grams of the bread flour with rye flour for a deeper, earthier flavor and a somewhat denser crumb.
Keep an eye on the dough as it develops, since changing the flour can affect its texture.
Seeded Sourdough Bread
Add seeds for extra texture and flavor.
Gently stretch the dough into a flatter shape before folding the seeds into it during shaping. Keep the total weight of additions under 100 grams to help preserve the loaf’s structure.
Herb and Cheese Sourdough Bread
Dried herbs or grated cheese can add a savory twist to this sandwich bread.
Fold the additions into the dough during shaping. Keep the total amount of additions under 100 grams, as Mal recommends, so they don’t overwhelm the dough.
Honey Sourdough Bread
For a slightly sweeter loaf that’s especially nice for toast, add 20 grams of honey when mixing the starter and water.
The basic fermentation and baking method remains the same.
Sourdough Rolls
You can also use this dough to make eight rolls instead of one loaf.
Divide the dough into eight pieces and shape each piece into a tight ball. Place them in a greased muffin tin and bake at 425°F for approximately 20–25 minutes, checking for a fully baked center.
Because smaller rolls bake differently from a full loaf, watch their color and doneness as they approach the end of the baking time.

How to Store Sourdough Sandwich Bread
Allow the bread to cool completely before storing it.
For a crust that stays firmer, Mal prefers keeping the loaf in a cotton bread bag or wrapping it loosely in a clean tea towel.
The bread should keep at room temperature for several days, although the crust and interior will gradually change as the loaf ages. For the best quality, enjoy it while fresh.
If you prefer a softer crust, you can store the bread in a suitable airtight container, but the crust will soften.
Can You Freeze Sourdough Sandwich Bread?
Yes! Freezing is a convenient way to keep homemade bread on hand without needing to bake as often.
Let the loaf cool completely, then slice it.
Stack the slices with small pieces of parchment paper between them so you can separate individual slices easily. Wrap the stack tightly in foil and place it in a freezer bag.
Frozen slices can go directly into the toaster, making it easy to enjoy homemade sourdough whenever you need it.
How to Refresh Day-Old Sourdough Bread
If your loaf has started to firm up, wrap it in foil and warm it in a 300°F oven for 10–15 minutes.
The crust will soften slightly, but warming can help refresh the interior.
Can I Make This Bread Without a Stand Mixer?
Yes. This recipe is mixed by hand using a wooden spoon and your hands. The stretch-and-fold method develops the dough’s structure without requiring a stand mixer or extensive kneading.
Why Does This Recipe Need Such a Long Refrigerator Rest?
The cold ferment gives the dough additional time to develop flavor while slowing fermentation. It also firms up the dough, making it easier to handle and score before baking.
For this recipe, plan on at least 24 hours in the refrigerator, with up to 72 hours available for a longer ferment.
Do I Have to Use a Kitchen Scale?
A kitchen scale is strongly recommended.
Sourdough baking relies on the relationship between flour, water, starter, and salt. Measuring these ingredients by weight helps you repeat the recipe more consistently.
Can I Leave the Dough in the Refrigerator for Three Days?
Mal’s method allows for a refrigerator rest of up to 72 hours.
The longer rest generally develops a more pronounced sourdough flavor, but fermentation conditions and starter activity can affect the finished loaf. Follow the recipe’s timing and pay attention to how your dough behaves.
How Do I Know When the Bread Is Fully Baked?
Look for a deep golden-brown crust. The loaf should feel firm, and tapping the bottom should produce a hollow sound.
For a more precise check, use an instant-read thermometer to look for an internal temperature of approximately 200–210°F.
Why Should I Wait Before Slicing the Bread?
The interior continues setting as the bread cools. Cutting too early can compress the crumb and leave the center gummy.
Let the loaf cool on a wire rack for at least one hour before slicing.
What to Serve with Sourdough Sandwich Bread
One of the best things about having homemade sandwich bread ready to use is how easily it fits into everyday meals.
Use thick slices for classic sandwiches, from turkey and cheese to leftover roast meat and vegetables.
Toast a slice and top it with butter, jam, or honey for breakfast. It also works well alongside a bowl of homemade soup or a simple lunch salad.
If you freeze the bread in slices, you can take out only what you need for breakfast or lunch instead of thawing the entire loaf.
A Homemade Loaf Worth the Wait
Mal’s sourdough sandwich bread takes a little planning, but the process is easier than it might seem. Once the dough is mixed and the folds are complete, most of the work happens while the dough rests.
The long refrigerator ferment makes it possible to work bread baking into your schedule, whether you’re preparing ahead for weekday lunches or simply want a fresh loaf for the family.
After all her experimenting, this is the bread Mal keeps coming back to. With a simple ingredient list and a method you can repeat week after week, it’s a wonderful recipe to add to your homemade bread collection.
Stay connected with Wholesome Farmhouse Recipes
Add Wholesome Farmhouse Recipes as a preferred source in Google Search to make it easier to find our recipes and cooking ideas when you're searching for something delicious to make.


My family loved this!