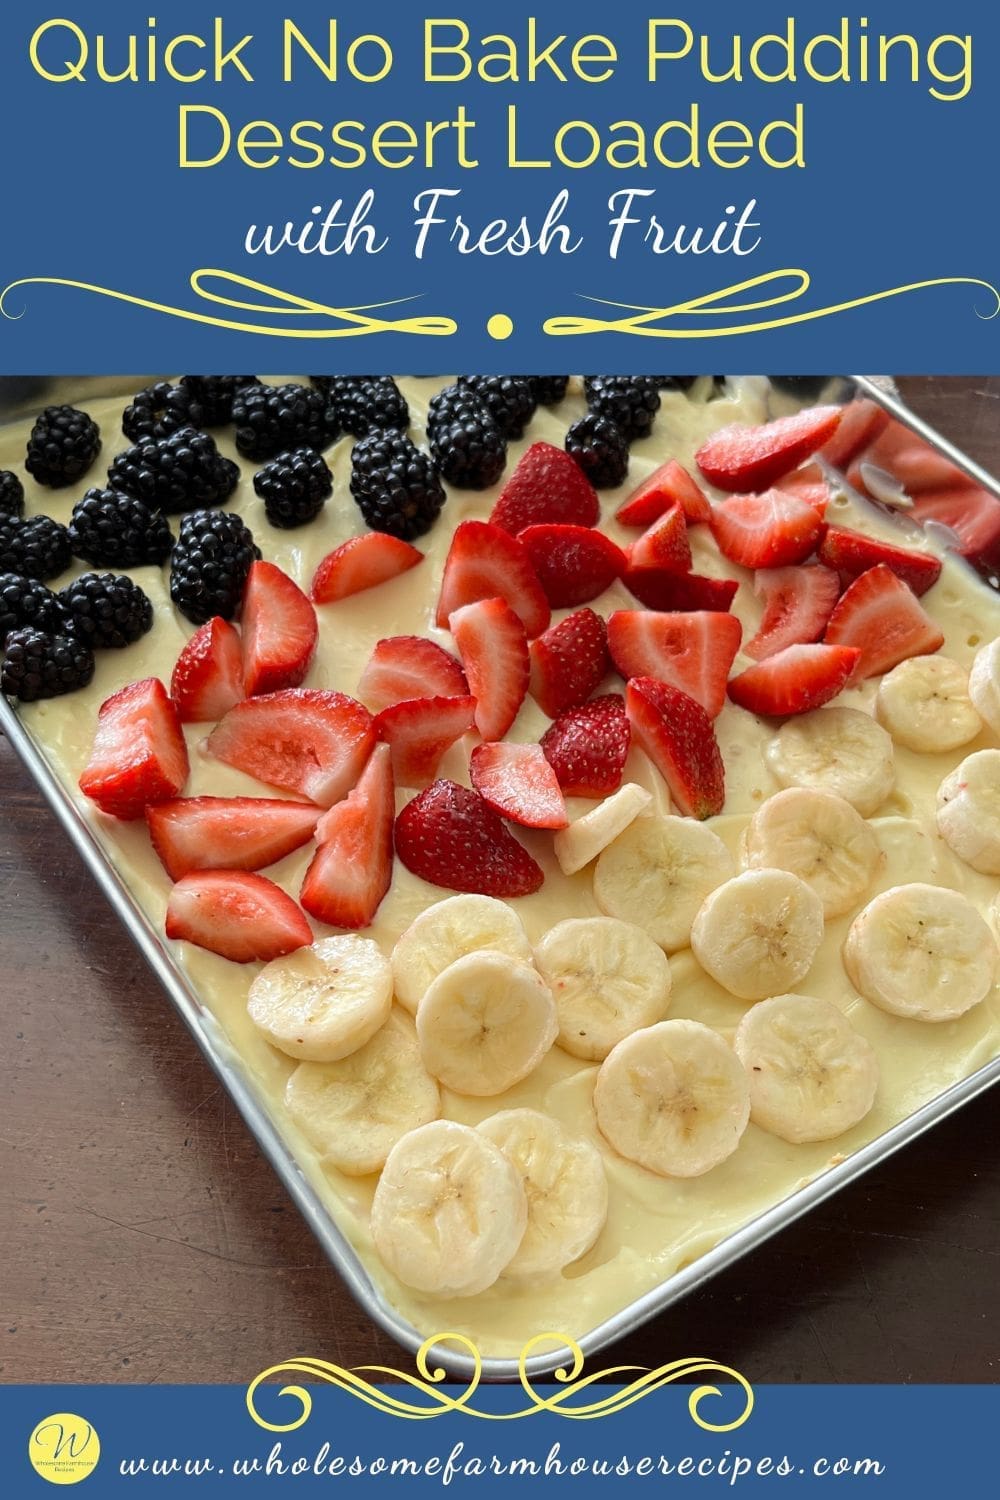
Cracker crust meets silky pudding and ripe berries in this no bake pudding dessert. Your fridge does all the work while you take all the credit. Nothing to bake.
This dessert was created out of necessity. You know the feeling: you need a dessert to pass for your friends and kids and you only have 20 minutes to make it. And I forgot to figure out a recipe ahead of time.
That’s when this pudding dessert comes to save you. Using what I had on hand, this no bake dessert was a hit at the party. There were no leftovers to take home.
Layers of graham crackers mixed with animal crackers, velvety cream cheese pudding, and fresh sliced fruit on the top.
Three simple layers. One chilled pan. Zero stress.
Best part; the kids love it too.
Why This Recipe Works
This dessert succeeds because it balances textures and manages moisture like a pro.
The cracker crust isn’t just filler. It’s engineered to stay crisp-ish even after hours in the fridge, thanks to enough melted butter to bind the crumbs into a layer that resists sogginess. Mixing graham and animal crackers gives you complexity without effort: one brings caramel-y depth, the other adds a hint of vanilla and whimsy. That combination is what keeps each bite interesting instead of one-note.
The cream cheese folded into the pudding is the move that separates this from a basic boxed-mix situation. It adds body, tangy richness, and a mousse-like texture that makes the whole thing feel more luxurious than the ingredient list suggests.
When you whisk softened cream cheese into thickened pudding, you’re essentially turning a simple vanilla base into something that could pass for a cheesecake filling.
Fresh fruit on top isn’t just pretty. Berries and bananas bring acidity, natural sweetness, and juice that cuts through the richness of the cream cheese layer.
That brightness is what makes this dessert feel lighter and more balanced than it actually is. It’s the same reason lemon cuts through buttercream: contrast makes everything taste better. Here’s how to build this dessert from bottom to top without turning on a single burner.

Quick No Bake Pudding Dessert Loaded with Fresh Fruit
As an Amazon Associate I earn from qualifying purchases.
Kitchen Essentials


Ingredients
For the Crust
- 1 Cup Graham Cracker Crumbs
- 1 Cup Animal Cracker Crumbs or vanilla wafers
- 7 Tablespoons Butter melted
For the Filling
- 3.4 Ounces Instant Vanilla Pudding Mix (1 package)
- 1 ¾ Cups Milk
- 8 Ounces Cream Cheese softened
For the Fruit Topping
- 2 Cups Mixed Berries
- 1 Cup Bananas sliced
Instructions
- In a medium bowl, whisk together the instant pudding mix and 1 ¾ cups milk for about 2 minutes. It should start to thicken almost immediately. Set it aside while you work on the crust. The pudding will continue to firm up as it sits, which is exactly what you want.3.4 Ounces Instant Vanilla Pudding Mix, 1 ¾ Cups Milk
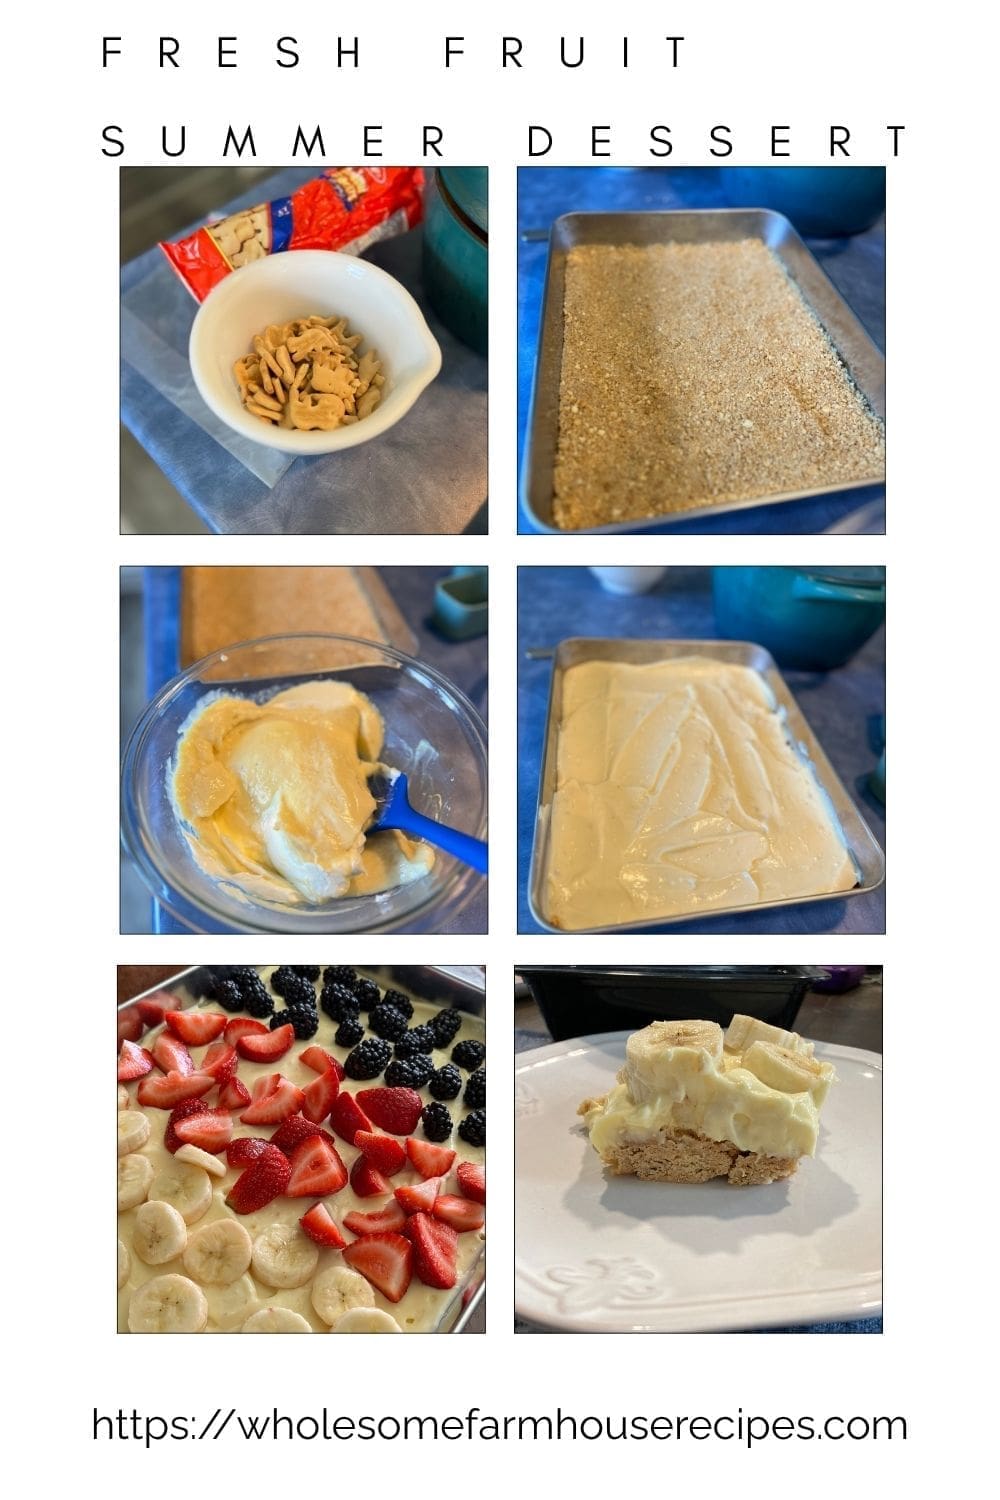
- Make the cracker crust. Crush the graham crackers and animal crackers into fine crumbs using a food processor. Or put the crackers in a zip-top bag and crush with a rolling pin. Dump the crumbs into a bowl.1 Cup Graham Cracker Crumbs, 1 Cup Animal Cracker Crumbs
- Melt the butter, then add it to the crumbs. Stir well until the mixture holds together when you press it between your fingers. You're looking for wet sand consistency, not soup.7 Tablespoons Butter
- Pour the buttered crumb mixture into a 9×13 inch pan. Use your hands or the bottom of a measuring cup to press it into an even layer across the entire bottom. Press firmly so it packs down and won’t fall apart when you slice later. Don’t skip the edges.
- Soften the cream cheese. Place the block of cream cheese in a microwave-safe bowl. Microwave in 20-second bursts, stirring between each round, until it’s soft and easy to stir but not melted or hot. This usually takes 40 to 60 seconds total. If you overheat it, let it cool before the next step.8 Ounces Cream Cheese
- Fold cream cheese into pudding. Add the softened cream cheese to the thickened pudding. Use a spatula to gently fold it in until mostly combined, then switch to a whisk and beat until the mixture is completely smooth with no lumps. This should take about a minute of whisking. The mixture will be thick, creamy, and pale yellow.
- Pour the pudding mixture over the cracker crust in the pan. Use a spatula to spread it into an even layer, making sure it reaches all the corners. The layer should be smooth and flat.
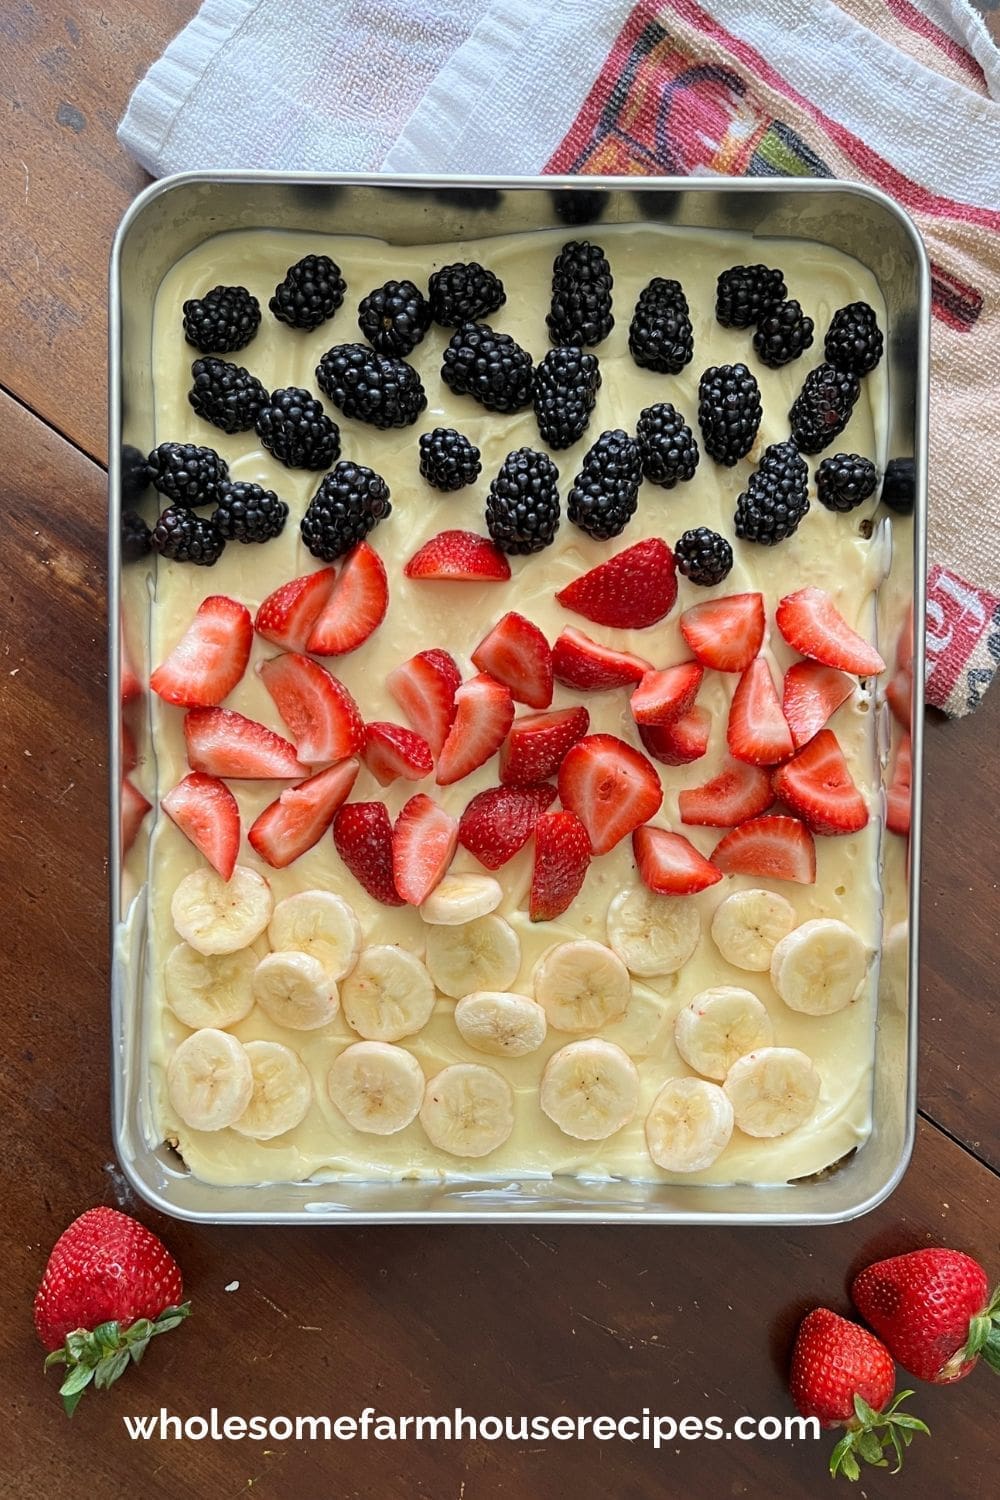
- Add the fruit. Slice your berries and bananas into pieces slightly smaller than bite-sized. Arrange them evenly over the pudding layer. You can go artful or random; both work. Just make sure the fruit is distributed so every slice of dessert gets some.2 Cups Mixed Berries, 1 Cup Bananas
- Chill before serving. Cover the pan with plastic wrap or foil and refrigerate for at least 2 hours, or up to overnight. The crust needs time to set, and the flavors need time to meld. Serve cold, straight from the fridge. If time doesn’t permit, you can serve it, but the crust won’t be perfectly set up yet. Kids won’t care.
Your Own Private Notes
Nutrition
Best Fruits to Use
Not all fruit works equally well in this layered dessert. You want fruit that adds flavor and visual appeal without making the pudding layer watery or causing the whole thing to slide apart.
Strawberries are the classic choice. Slice them thin so they lay flat and cover more surface area. They’re sweet, bright red, and everyone recognizes them. If your berries aren’t peak season, a tiny pinch of sugar on top before chilling can help.
Blueberries can go on whole. They add little bursts of juice and a deep purple color that contrasts beautifully with the pale pudding. Fresh is better than frozen here since frozen berries release too much liquid as they thaw.
Raspberries and blackberries bring tartness and texture. Their seeds add a slight crunch that plays well against the creamy pudding. Use them sparingly if you’re serving kids who might be picky about seeds.
Bananas add a creamy, mellow sweetness that works especially well with vanilla pudding. Slice them into rounds right before assembling so they don’t brown. If you’re making this ahead, toss banana slices in a little lemon juice to slow browning.
Kiwi is underrated. The bright green color is stunning against berries, and the tartness cuts through the richness like a champ. Peel and slice thin.
Mandarin oranges from a can, drained well, add a citrusy sweetness without extra moisture. They’re a great option in winter when fresh berries are expensive or flavorless.
Avoid watermelon, cantaloupe, or honeydew. They’re too watery and will make your dessert soggy. Skip apples and pears unless you dice them extremely small; they don’t soften in the fridge and can feel out of place texture-wise.
Recipe Variations
This base recipe is flexible enough to riff on once you understand the ratios and structure.
Chocolate pudding version. Swap the vanilla pudding for chocolate or chocolate fudge instant pudding. The cream cheese still works beautifully, and the tang balances the cocoa. Top with sliced strawberries or raspberries for a chocolate-covered-strawberry vibe.
Lemon pudding with berries. Use lemon instant pudding and top with blueberries and raspberries. It tastes like a lemon tart but requires zero baking skills. Add lemon zest to the cream cheese for extra brightness.
Banana cream pie layers. Use banana cream pudding, fold in the cream cheese, and top with only banana slices. Crush some vanilla wafers into the crust instead of animal crackers for full banana cream pie energy.
Peanut butter twist. Add 3 tablespoons of creamy peanut butter to the cream cheese before folding it into the pudding. Top with banana slices and a handful of mini chocolate chips. It’s basically a peanut butter banana dream.
Oreo crust swap. Replace the graham and animal crackers with crushed Oreos (cream filling and all). You’ll need slightly less butter since Oreos already have fat in the filling. This makes the whole thing richer and more decadent.
Coconut cream version. Use coconut cream pudding and fold in some shredded sweetened coconut with the cream cheese. Top with tropical fruit like mango, pineapple, and kiwi. Toast some extra coconut and sprinkle it on top right before serving.
Tips for Success
Small details make the difference between a dessert that’s just okay and one people ask you to bring every time.
Make sure your cream cheese is truly soft. Cold cream cheese will not fold into pudding smoothly no matter how hard you whisk. You’ll end up with lumps. Microwave it in short bursts and stir between each one. It should be soft enough to stir easily but not melted or warm.
Don’t skip the whisking step after folding in cream cheese. A spatula gets you most of the way there, but a whisk is what makes the mixture completely smooth and airy. Whisk for a full minute until you see no streaks.
Press the crust firmly and evenly. Use the bottom of a flat measuring cup or glass to pack it down. If the crust isn’t compressed enough, it’ll crumble when you try to slice the dessert later. Pay special attention to the corners and edges.
Slice your fruit into small, even pieces. Big chunks look impressive but make the dessert hard to serve and eat. You want a little fruit in every bite, not one giant strawberry slice that slides off when someone cuts into it.
Chill for the full 2 hours minimum. The crust needs time to firm up, and the pudding layer needs time to fully set. If you try to serve it too early, everything will be loose and messy. If you have time, overnight is even better.
Use a sharp knife dipped in hot water to slice clean portions. Wipe the knife between cuts. This keeps the layers distinct and prevents the crust from dragging through the pudding.
Make Ahead Tips
This dessert is built to be made ahead, which is one of the main reasons it’s so popular for gatherings.
You can make the entire dessert up to 24 hours in advance. Cover it tightly with plastic wrap or foil and keep it refrigerated. The crust will soften slightly over time, but it’ll still have texture and the flavors will meld beautifully.
If you’re using bananas, wait to add them until a few hours before serving. Bananas brown in the fridge even when the dessert is covered. You can prep everything else the night before, then slice and add bananas the morning of your event.
The crust and pudding layer can be assembled separately even earlier. Make the crust, press it into the pan, and refrigerate it up to 2 days ahead.
Make the pudding mixture, cover it, and refrigerate separately. Spread the pudding over the crust and add fruit the day you plan to serve.
To prevent fruit from making the pudding watery, pat berries dry with a paper towel before arranging them on top. Excess moisture on the surface of the fruit can pool on the pudding layer if the dessert sits for a long time.
Don’t freeze this dessert. The pudding layer will weep and separate when thawed, and the crust will turn soggy. This is a make-ahead-and-refrigerate situation only.
If you’re transporting it, keep it covered and cold. Bring an ice pack or cooler if you’re driving more than 20 minutes. The dessert holds up well to travel as long as it stays chilled.
Pairing Suggestions
This dessert is rich and creamy, so you want pairings that either match that indulgence or cut through it with brightness.
Coffee or cold brew. The bitterness balances the sweetness and makes this feel like a proper afternoon treat. A latte works too if you want to double down on creaminess.
Sparkling wine or prosecco. The bubbles and acidity slice through the richness of the cream cheese pudding. It’s a surprisingly elegant pairing for something this casual.
Iced tea with lemon: The tannins and citrus keep your palate fresh between bites. Unsweetened or lightly sweetened works best.
Whipped cream on the side. If you want to go full decadent, a dollop of barely sweetened whipped cream on each slice makes this feel like a celebration.
Fresh mint. A few torn mint leaves scattered over the fruit right before serving add a pop of color and a bright, herbal note that wakes everything up.
No-Bake Pudding Dessert
Did you know that no-bake desserts exploded in American home kitchens during the mid-20th century, right when instant pudding mixes and refrigerators became standard household items.
Suddenly, you didn’t need an oven or a double boiler to make something impressive. Layered pudding desserts like this one became potluck legends because they traveled well, served a crowd, and tasted expensive without the fuss.
This dessert doesn’t need much. It’s already doing a lot of heavy lifting on its own, so keep sides simple and drinks refreshing.
This is the kind of dessert that makes you look like you have your life together even when you absolutely don’t. No oven, no fuss, just layers of creamy, crunchy, fruity goodness that you assembled in about 15 minutes of actual work. The fridge did the rest.
It’s a potluck winner, a weeknight save, and a summer staple all in one pan. Make it once and it’ll become your default move every time someone says “bring dessert” and you’re fresh out of time.


My family and friends love this no bake dessert and I love how easy it is to make this.